
Water pooling around your faucet base during or after use is a specific, identifiable problem — and a faucet leaking at the base is almost always caused by worn O-rings inside the faucet body. This is a straightforward DIY repair in most cases. But before you start disassembling anything, the first step is confirming exactly where the water is coming from.
Disclosure: This article contains affiliate links. If you purchase through these links, we may earn a small commission at no extra cost to you. As an Amazon Associate, we earn from qualifying purchases.
Why Your Faucet Is Leaking at the Base (Not the Spout)
A base leak and a spout drip are different problems with different causes. A dripping spout typically points to a worn cartridge, damaged washer, or deteriorated valve seat — components that control water flow. A faucet leaking at the base is a sealing failure around the faucet body itself.
Every faucet has O-rings — small rubber rings seated in grooves on the faucet stem or body. Their job is to keep water moving through the interior of the faucet and out through the spout. When those O-rings degrade, water escapes sideways around the faucet body and shows up at the base.
The key diagnostic clue: a base leak caused by O-ring failure almost always appears when the faucet is running and stops when it is off. That timing tells you the leak is pressure-driven — the O-ring is failing under load, not at rest.
This behavior is consistent across kitchen and bathroom faucets. The O-ring location varies slightly by design, but the failure mode is the same.
The Most Common Cause: Worn O-Rings
O-rings are inexpensive, but they do not last forever. Several factors accelerate their failure:
- Age and dryness — Rubber dries out and cracks over time, especially in low-humidity environments
- Hard water — Mineral deposits can coat and degrade rubber, or prevent a clean seal in the groove
- Heat exposure — Repeated contact with hot water shortens O-ring lifespan
- Overtightening — Cranking the faucet handle too hard compresses O-rings repeatedly and distorts them
In a single-handle faucet, O-rings typically sit on the cartridge or valve body. In a two-handle faucet, each stem has its own set of O-rings. Either way, when they go, water finds the path of least resistance — out around the base.
Replacement O-rings are inexpensive and widely available. A faucet O-ring assortment kit covers the common sizes used in most residential kitchen and bathroom faucets and costs under $10 — it is worth having on hand before you start the repair so you are not making a hardware store run mid-job.
How to Confirm the Faucet Base Leak
Do not skip this step. Confirming a faucet leaking at the base before disassembly saves you from tearing into the wrong part of the faucet — water under a sink can come from several sources, including supply line connections, a nearby drain, or condensation, and it can track along surfaces in misleading ways.
Step 1: Dry the entire faucet base, the counter around it, and the area directly under the sink with paper towels. Everything should be completely dry.
Step 2: Run the faucet at normal pressure for 30 seconds.
Step 3: Watch where water appears first. You are looking for moisture at the faucet body itself — where the faucet meets the sink deck — not at the handle, spout, or underneath the sink.
Step 4: Check the supply line connections under the sink. A loose or failing supply line can drip onto the cabinet floor and look like a base leak from above. Run your finger along each supply line connection and feel for moisture.
Step 5: If water appears specifically at the faucet base while the faucet runs and stops when you turn it off, O-ring failure is your cause.
Important distinction: If the base is wet even when the faucet is completely off, the problem is more likely a supply line connection or a valve fitting issue — not O-ring failure. That is a different repair.
Step-by-Step Fix for a Faucet Leaking at the Base
Before You Start
- Turn off both supply valves under the sink by turning them clockwise until they stop
- Open the faucet to release water pressure and drain the lines
- Place a towel or small bucket under the work area
- Take a photo of the faucet assembly before you touch anything — you will thank yourself during reassembly
Repair Steps
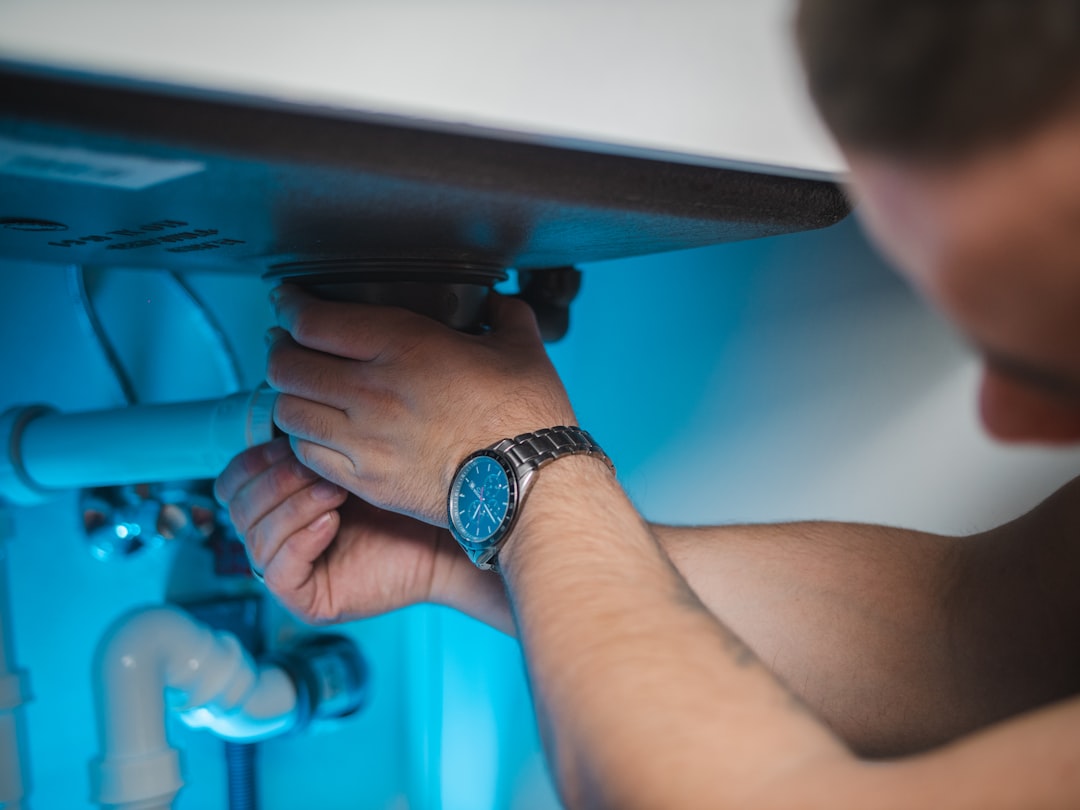
- Remove the faucet handle. Most handles have a decorative cap on top concealing a screw. Pry the cap off gently with a flathead screwdriver and remove the screw underneath. Pull the handle straight up or rock it gently to free it.
- Access the cartridge. For a single-handle faucet, you will see a retaining nut, clip, or collar holding the cartridge in place. The retention system varies by brand — Moen uses a retaining clip, Delta uses a ball-and-cam system, and Price Pfister (now Pfister) uses a cartridge collar. Remove whatever is holding the cartridge in place and pull it straight out.
- Locate the O-rings. They sit in grooves on the cartridge body or on the faucet valve body. A worn O-ring will look flattened, cracked, shiny, or misshapen rather than round and matte.
- Remove the old O-rings. Roll them out of their grooves carefully. Note how many there are and where each one sits before removing them. Do not use a knife or sharp tool — you risk scoring the groove, which can prevent a clean seal. Instead, use a wooden toothpick or an O-ring pick tool designed for this purpose.
- Match your replacements. Bring the old O-rings to a hardware store for an exact size match, or compare them to an assortment kit. Both the inner diameter and the cross-section thickness need to match — a ring that is even slightly too small will not seal.
- Apply silicone plumber’s grease. Before installing the new O-rings, coat them lightly with silicone-based plumber’s grease. This reduces friction during reassembly, helps seat the ring properly, and extends its service life. Note: silicone grease is not the same as plumber’s putty — putty is used during faucet installation for surface sealing and will not help here.
- Seat the new O-rings. Press each ring into its groove so it sits flush and even. A twisted or bunched O-ring will leak immediately.
- Reinstall the cartridge and hardware. Reverse your disassembly steps. Make sure the cartridge is fully seated before tightening the retaining hardware.
- Turn the supply valves back on slowly. Open them gradually to avoid pressure spikes.
- Test. Dry the base area completely, run the faucet, and watch for any moisture at the base. If it is dry, the repair is complete.
When Replacing O-Rings Doesn’t Stop the Leak
If water pooling around the faucet base continues after new O-rings, work through these causes in order:
Cartridge failure: The cartridge itself may be cracked or internally worn. Cartridges are brand-specific — check the faucet brand and model number (often stamped on the body or on the original packaging) and search for the correct replacement. For example, a Moen single-handle faucet commonly uses the Moen 1225 cartridge. Searching by brand and handle count will get you to the right part.
Damaged faucet body: If the groove or seating surface where the O-ring rests is pitted, corroded, or cracked, a new O-ring cannot form a proper seal against it. Inspect the area with a flashlight. If the surface is compromised, O-ring replacement will not hold — faucet replacement is the practical next step.
Incorrect O-ring size: An O-ring that is marginally too small stretches thin and fails under pressure. One that is too large bulges out of the groove and allows water past. Both dimensions — inner diameter and cross-section thickness — must match the original exactly.
Loose faucet mounting nut: If the nut securing the faucet to the sink deck has loosened over time, the faucet body shifts slightly when the water runs. That movement breaks the seal even with new O-rings. Check the mounting nut under the sink and tighten it with a basin wrench if it has any play. A basin wrench is a long-handled tool specifically designed for reaching up into tight spaces behind the sink — an adjustable wrench will not reach this nut on most installations.
When to Stop DIYing and Call a Plumber
Most cases of a faucet leaking at the base are genuinely within DIY reach. Call a plumber if:
- The faucet body is cracked or corroded through — no seal repair will hold on a compromised body
- The supply shutoff valve under the sink will not close fully, preventing you from safely stopping water flow
- The leak is coming from a corroded or brittle supply line fitting — this is a different job involving pipe connections
- You have replaced both the O-rings and the cartridge and the leak persists — at that point, full faucet replacement is more cost-effective, and a plumber can complete the swap in under an hour
One additional flag: if your home is older and you find corroded shutoff valves while doing this repair, do not force them. Valves that have not moved in years sometimes fail when turned. Have a plumber assess them rather than risk a valve failure with no easy way to stop the water.
How to Prevent a Faucet Base Leak From Recurring
Prevention here is specific, not just “maintain your plumbing.”
- Replace O-rings proactively during any faucet disassembly, even if they look fine. The cost is negligible and the access is already done.
- Apply silicone grease to O-rings any time you reassemble a faucet — it dramatically extends their service life and is the single easiest way to avoid a faucet leaking at the base in the future.
- Avoid overtightening handles. Shutting off a faucet firmly is fine; cranking it hard repeatedly deforms the O-rings over time.
- Watch for hard water buildup on the faucet body. Visible mineral scale is a sign that internal seals are under stress. Clean the aerator (the screen at the spout tip) and consider a water softener if your water is very hard.
- Check your home’s water pressure. Residential water pressure should fall between 40 and 80 PSI (pounds per square inch). Anything consistently above 80 PSI accelerates wear on every faucet, valve, and seal in the house. A pressure-reducing valve (PRV) installed at the main line protects the entire system.
- Check under the sink periodically. A slow weep around a faucet base can saturate the cabinet floor for weeks before becoming visible. Early detection prevents wood swelling and mold. Look for any moisture at the supply line connections and around the faucet base itself while you are down there. While you are inspecting the area, it is also a good time to check your dishwasher drain connection if it ties into the same sink drain — a Dishwasher Not Draining: Causes and Fixes guide can help you work through that separately if you spot any standing water there.
Frequently Asked Questions
Why does my faucet only leak at the base when I turn it on?
This is the clearest sign of O-ring failure. The seal only has to perform under pressure. When the faucet runs and water pressure builds inside the body, a worn O-ring cannot hold and water escapes around the faucet base. When the faucet is off and there is no pressure, even a degraded O-ring may still hold — which is why the leak disappears the moment you shut off the water.
Can I use plumber’s putty to seal a faucet base leak?
No. Plumber’s putty is used during initial faucet installation to create a surface seal between the faucet base and the sink deck. It does not fix O-ring failure inside the faucet body. Applying putty to the outside of the base treats the symptom rather than the cause and will fail. The correct fix is replacing the internal O-rings.
How do I know what size O-rings my faucet uses?
The safest method is to remove the old O-rings and bring them to a hardware store for matching. A hardware associate can cross-reference the size by measuring the inner diameter and cross-section thickness. An O-ring assortment kit gives you a range of common sizes to try if you are comfortable eyeballing the fit. Some faucet manufacturers also publish brand-specific repair kits that include the correct O-rings for their models.
My faucet base is leaking but it is brand new — what is wrong?
A new faucet leaking at the base during or immediately after installation usually means the O-ring was pinched or rolled out of its groove during assembly, or the cartridge was not fully seated. This is more common than most people expect. Disassemble the faucet, inspect the O-ring seating carefully, and reassemble with slow, even pressure to make sure everything is seated correctly before tightening.
Is a faucet base leak going to cause water damage?
It can, particularly with kitchen faucets where water seeps directly into the cabinet below. Even a slow, intermittent drip causes wood swelling, warped cabinet floors, and eventual mold growth if left unaddressed for weeks or months. A faucet leaking at the base should be repaired promptly — it is not the kind of problem that resolves itself or stays small indefinitely.

