
Disclosure: This article contains affiliate links. If you purchase through these links, we may earn a small commission at no extra cost to you. As an Amazon Associate, we earn from qualifying purchases.
By Mike Torrance
There are three types of toilet repair kits, and they exist for a reason. The best toilet repair kit for your situation depends entirely on which part is actually failing — and buying the wrong one wastes both money and a trip to the hardware store. A toilet flapper replacement kit won’t fix a worn fill valve. A running toilet repair kit marketed as “complete” might not include the flush valve seat you actually need. This article cuts through the confusion and helps you match the right kit to your specific problem.
Disclosure: This article contains affiliate links. If you purchase through these links, we may earn a small commission at no extra cost to you. As an Amazon Associate, we earn from qualifying purchases.
What Type of Toilet Repair Kit Do You Actually Need
Before you buy anything, answer two questions:
- Which component is causing the problem?
- How old is the toilet, and how many parts are close to failing?
Here’s a quick overview of what each kit actually addresses:
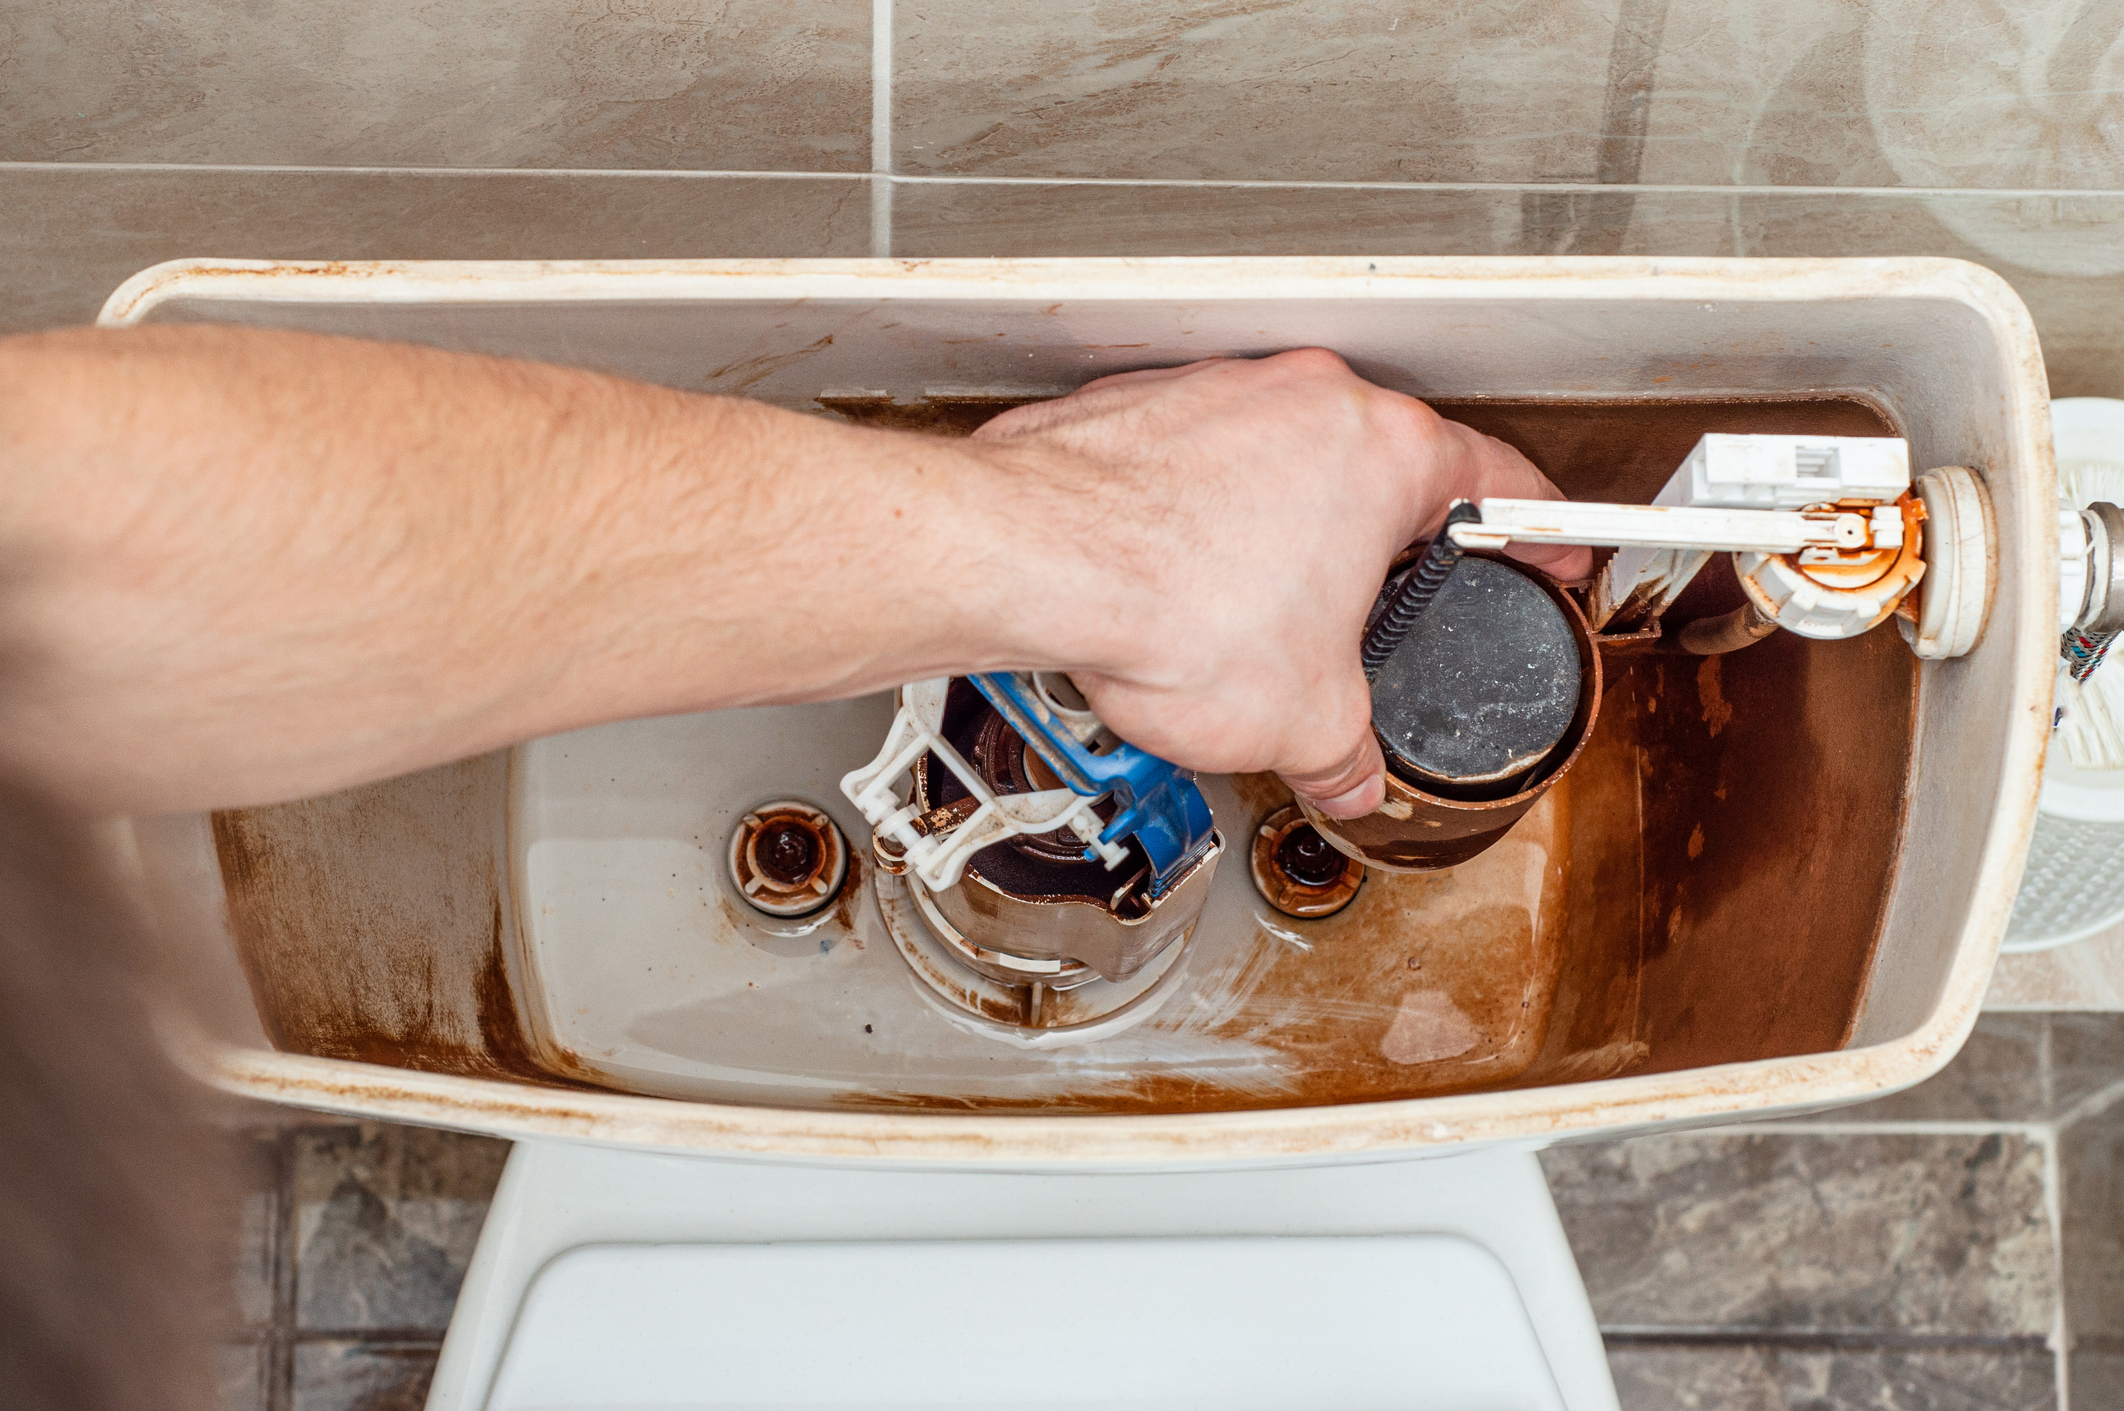
- Flapper kit — The flapper is the rubber seal at the bottom of the tank. It seals the opening between the tank and bowl. When it fails, water leaks continuously from the tank into the bowl, causing the toilet to run.
- Fill valve kit — The fill valve controls how the tank refills after a flush. When it wears out or gets out of adjustment, you hear hissing, the tank refills slowly, or the toilet cycles on and off without being flushed.
- Complete rebuild kit — Replaces both components plus the flush valve seat (the opening the flapper seals against), and sometimes includes the trip lever and handle hardware. Best when a toilet is old or when multiple parts are failing at once.
| Kit Type | Problem It Fixes | Best Use Case | Avg. Cost |
|---|---|---|---|
| Flapper kit | Water leaking into bowl | Single worn flapper, toilet runs constantly | $5–$12 |
| Fill valve kit | Hissing, slow refill, phantom cycling | Fill valve worn or misadjusted | $10–$18 |
| Complete rebuild kit | Multiple failing parts or unknown cause | Toilet over 10 years old, recurring problems | $15–$30 |
If you haven’t confirmed which component is failing, diagnose before you buy the best toilet repair kit for your situation. Running a dye test or checking the water level against the overflow tube takes five minutes and prevents a wasted purchase. See our nighttime running toilet diagnosis guide for step-by-step confirmation before you head to the hardware store.
Best Toilet Repair Kit for a Leaking Flapper — When One Part Is Enough
A toilet flapper replacement kit is the right call when:
- A dye test confirmed water passing from tank to bowl without flushing
- The flapper is visibly warped, cracked, or coated in mineral buildup
- The toilet runs constantly or intermittently and the fill valve is functioning normally
What a good flapper kit should include
- The flapper itself (universal fit or model-specific)
- Replacement chain (some kits include one, some don’t — check the package)
- Mounting ears or a seat ring that fits your overflow tube diameter
Key selection criteria
Fit. Universal flappers like the Fluidmaster 501 and Korky 100BP cover most standard two-inch seats. But some toilets — particularly American Standard, Kohler, and Mansfield — use non-standard seat geometry and need model-specific flappers. Don’t assume universal means universal for every brand.
Material. Standard rubber flappers degrade faster in water treated with chloramines (a disinfectant used in place of or in addition to chlorine). If your municipality uses chloramine treatment, look specifically for chloramine-resistant flappers. You can check by calling your water utility or looking at your annual water quality report.
Chain length. A chain that’s too short holds the flapper open and the toilet runs constantly. One that’s too long gets trapped under the flapper and prevents it from sealing. Adjustable chain kits avoid both problems.
Choosing the best toilet repair kit for a flapper problem is straightforward once you’ve confirmed the diagnosis. A quality universal toilet flapper is one of the easiest plumbing fixes in the house — installation takes 10–15 minutes in most cases, and no tools are required. If you want a full walkthrough of the process, see How to Replace a Toilet Flapper Step by Step before you get started.
Best Toilet Repair Kit for Fill Valve Problems — The Underrated Cause of Running Toilets
A toilet fill valve repair kit is the right call when:
- The tank refills slowly or incompletely after flushing
- You hear a hissing sound that continues after the tank is full
- The water level is sitting above the top of the overflow tube — which causes phantom cycling (the fill valve turns on by itself)
- You already replaced the flapper and the toilet still runs
This last point matters. Fill valve failure is frequently the actual cause of a running toilet, even when the flapper gets blamed first. Confirm which component is failing before purchasing — the diagnosis steps in our nighttime running toilet article walk through exactly how to tell the difference.
What a good fill valve kit includes
- The fill valve assembly (modern valves use an adjustable float rather than a ballcock arm)
- Refill tube with angle adapter
- Locking nut and tank base seal
Key selection criteria
Adjustability. A fill valve with an adjustable float lets you set the exact water level in the tank. This prevents overflow tube cycling and helps with water efficiency. Any kit worth buying should have this.
Height range. Fill valves typically adjust from about 7 to 13 inches. The right height depends on your tank depth. Measure from the bottom of the tank to the top of the overflow tube before purchasing — a valve that’s too short won’t reach the correct water level, and one that’s too tall will hit the tank lid.
Fit. The Fluidmaster 400H-002 Performax toilet fill valve and Korky 528 are the most widely compatible universal options and fit most standard tanks. Some Toto and Kohler models, however, benefit from brand-specific valves due to tank geometry. Check your model number if you’re not certain.
The best toilet repair kit for a fill valve issue is an adjustable toilet fill valve assembly. Installation takes 20–30 minutes and requires shutting off the supply valve and emptying the tank before you start.
Best Complete Toilet Rebuild Kit — When to Replace Everything at Once
A complete toilet rebuild kit makes sense when:
- The toilet is 10 or more years old and has already had repair attempts
- You replaced the flapper, the toilet still runs, and now you suspect the fill valve too
- You’re doing maintenance on a rental property and want to eliminate callbacks
- The flush valve seat — the drain opening at the bottom of the tank — is pitted, cracked, or rough and won’t seal cleanly even with a new flapper
What a complete kit should include
- Fill valve assembly
- Flapper
- Flush valve seat (sometimes a snap-on repair seat rather than a full replacement)
- Refill tube
- Trip lever and handle hardware (on premium kits)
- All required seals and hardware
What to watch for
Some kits marketed as “complete” only include a flapper and fill valve. They skip the flush valve seat entirely. If your seat is damaged, a two-piece kit won’t fully fix the problem.
Here’s the quick rule: kits labeled “2-piece” are flapper plus fill valve. Kits labeled “complete” or “rebuild kit” should include flush valve hardware. Read the contents list before you buy.
The best toilet repair kit in complete rebuild form — such as the Korky 4010PK or Fluidmaster 507AKR — covers most standard two-inch flush valve seats and fits the majority of two-piece toilets sold in the U.S.
One important caveat: tower-flush or canister-style flush systems — found in some newer Kohler and Glacier Bay models — don’t use flappers at all. Universal rebuild kits will not work on these. Confirm your flush valve type before purchasing.
How to Match a Repair Kit to Your Toilet Brand and Tank Style
This is the step most people skip, and it causes most of the returns and second hardware store trips. Not every toilet takes a universal kit — and choosing the best toilet repair kit for your specific toilet requires knowing your flush valve type first.
Flush valve types
- Standard flapper seat (2-inch): The most common type. Universal kits work well.
- Standard flapper seat (3-inch): Found in some American Standard and Kohler models. Requires a 3-inch flapper — check the package, because most universal kits are sized for 2-inch seats.
- Tower/canister flush valve: Found in newer Kohler Cimarron, some Glacier Bay, and dual-flush models. No flapper involved. You need a canister seal kit specific to the brand and model.
- Dual-flush: Requires brand-specific parts. Universal rebuild kits will not work.
How to confirm your flush valve type
- Remove the tank lid and set it aside
- Flush and watch what moves
- If a rubber flapper lifts up and drops back down — standard seat, universal kits apply
- If a cylindrical tower lifts straight up — canister-style, you need brand-specific parts
- Check the model number stamped inside the tank (usually near the water line or on the back wall) and verify before buying
One brand-specific note: Toto toilets often work better with Toto-manufactured flappers than with universal options. The seat geometry on some Toto models doesn’t seal reliably with generic flappers. If you have a Toto, check Toto’s own parts before defaulting to a universal kit.
What to Check Before Buying Any Toilet Repair Kit
Run through this checklist before you head to the hardware store. Selecting the best toilet repair kit for your situation comes down to confirming a few details before you buy:
- Confirm the failing component. If you’re not certain whether it’s the flapper or fill valve, diagnose before buying. Replacing the wrong part costs time and money.
- Measure your fill valve height. Tank depths vary. Measure from the bottom of the tank to the top of the overflow tube and match it to the valve’s adjustment range.
- Confirm flush valve type and seat size (covered above). Note whether you have a 2-inch seat, 3-inch seat, or canister-style valve — and write it down before leaving the house.
- Check for chloramine in your water. If your water is chloramine-treated, standard rubber flappers will degrade faster. The chloramine-resistant option costs a few dollars more and lasts significantly longer.
- Note your toilet brand and model number. It’s stamped inside the tank. A 30-second check before you leave the house prevents a return trip.
Frequently Asked Questions
Can I use a universal toilet repair kit on any toilet?
Not always. Universal kits work well on standard two-piece toilets with a 2-inch flapper seat — which covers most toilets sold in the U.S. They do not work on tower-flush (canister-style) systems or dual-flush toilets. If you have a newer Kohler, Glacier Bay, or dual-flush model, confirm your flush valve type before purchasing any universal kit.
Should I replace the flapper and fill valve at the same time?
If the toilet is more than 7–10 years old or you’ve had recurring problems, yes. The cost difference between a flapper-only kit and a complete toilet rebuild kit is usually under $10. Replacing both components at once eliminates the risk of diagnosing one failing part, fixing it, and then finding the other gives out within months.
Why does my toilet still run after replacing the flapper?
The fill valve is the most likely cause. A worn or misadjusted fill valve can mimic flapper symptoms — the toilet runs intermittently, cycles on without being flushed, or hisses even after the tank appears full. If you’ve already swapped the flapper and the problem persists, a toilet fill valve repair kit is the next purchase.
What is a 3-inch flapper and how do I know if I need one?
Some American Standard and Kohler toilets have a larger flush valve opening — 3 inches rather than the standard 2 inches. If you remove the tank lid and the drain opening at the bottom looks noticeably larger than a standard seat, measure it before buying. A 2-inch flapper on a 3-inch seat will not seal, and the toilet will continue to run regardless of how new the flapper is.
How long do toilet repair kits last?
A quality fill valve and flapper should last 5–7 years under normal use. Chloraminated water shortens flapper lifespan noticeably — sometimes down to 2–3 years for standard rubber flappers. Using chloramine-resistant parts extends the lifespan and is worth the small price premium if your municipality uses chloramine treatment.
Recommendation Summary
Here’s the short version of which best toilet repair kit applies to your situation:
- Toilet runs constantly, flapper is clearly failing → buy a toilet flapper replacement kit
- Hissing, slow refill, or phantom cycling → buy a toilet fill valve repair kit
- Toilet is 10+ years old, multiple symptoms, or recurring failures → buy a complete toilet rebuild kit
- Tower flush or dual-flush system → skip universal kits entirely; go brand-specific
For most homeowners doing a first repair on a standard two-piece toilet, the best toilet repair kit to start with is a complete rebuild kit from Fluidmaster or Korky. The price difference compared to a flapper-only kit is usually under $10, and replacing both the flapper and fill valve at the same time means you won’t be back under that tank lid in six months because the other part finally gave out.

DIY Home Repair & Plumbing

