If the AC is running, but the house isn’t cooling down, a frozen evaporator coil is one of the most likely causes. The air from your vents feels weak or warm. The system runs constantly without results. These are classic AC evaporator coil frozen symptoms — and they’re more common than most homeowners realize. The fix is usually DIY-accessible, but it has to be done in the right order. Skip a step and you risk water damage, a re-frozen coil, or a damaged compressor. This article walks you through how to confirm the freeze, thaw it safely, find the underlying cause, and stop it from happening again.
Disclosure: This article contains affiliate links. If you purchase through these links, we may earn a small commission at no extra cost to you. As an Amazon Associate, we earn from qualifying purchases.
What Causes AC Evaporator Coil Freezing (and Why It Matters for the Fix)
Freezing happens when the evaporator coil gets too cold and moisture from the air solidifies on its surface. There are three distinct causes. The thaw process is the same regardless of cause — but what you do after the thaw depends entirely on which one applies.
1. Restricted Airflow (Most Common)
A clogged or overly restrictive air filter is the leading cause of AC coil freezing up. Without enough warm air moving across the coil, the refrigerant inside gets too cold and ice begins to form. The problem compounds quickly. As ice builds up, it further blocks airflow, which makes the freeze worse.
Blocked return vents, closed supply vents, and a coil surface coated in dust and debris can all produce the same effect.
For most households, a mid-range pleated filter in the MERV 8–11 range is the right balance between filtration and airflow. MERV stands for Minimum Efficiency Reporting Value — it’s the standard rating for how well a filter captures airborne particles. A filter like the Filtrete 1500 MPR pleated filter is a solid option for most central AC systems.
2. Low Refrigerant Charge
When refrigerant leaks out, pressure inside the coil drops. Lower pressure means a lower boiling point for the refrigerant. The coil surface then falls below freezing even when airflow is normal.
This is not a DIY fix. Adding refrigerant requires EPA Section 608 certification and leak diagnosis tools. If this is your cause, you need a licensed HVAC technician.
3. Running the AC in Cold Outdoor Temperatures
Frozen AC Evaporator Coil Symptoms: How to Confirm the Diagnosis
The evaporator coil sits inside your air handler, which means you often can’t see it directly. But you don’t need to open the unit to spot the signs of a frozen AC coil. Work through these frozen evaporator coil signs in order.
Start with external indicators:
- Your AC runs constantly but the house never reaches the set temperature
- Airflow from supply vents is noticeably weak or warm
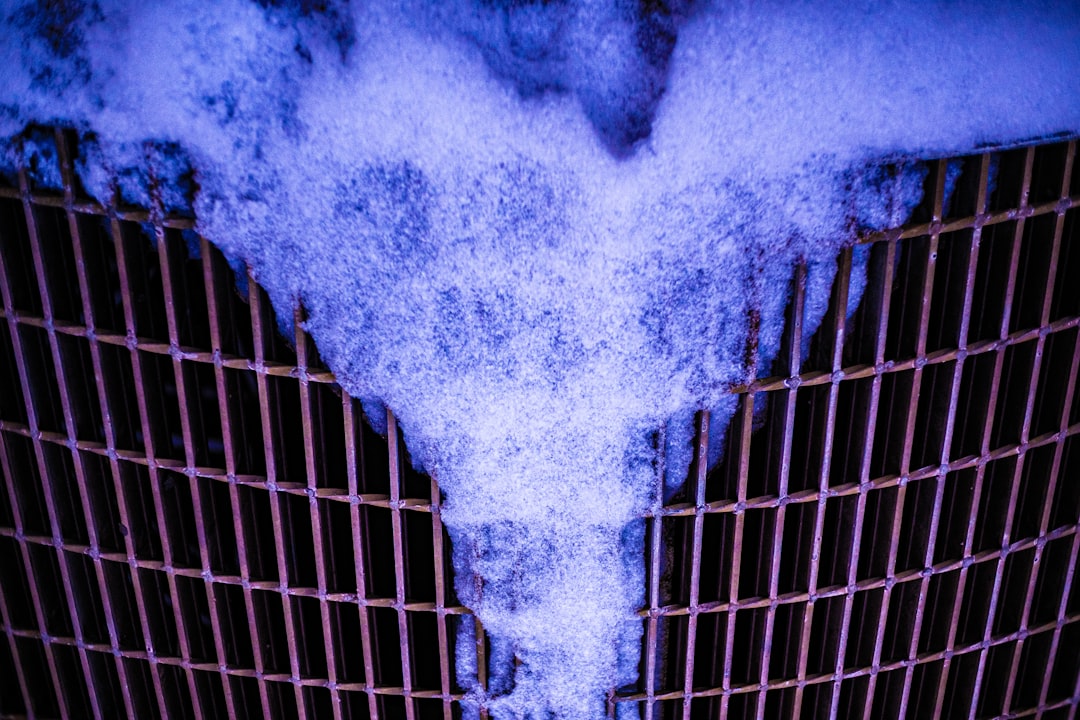
- Ice is visible on the large insulated copper refrigerant line running into the air handler — this is the most accessible indicator and is often visible without opening anything
- Water is pooling near the base of the air handler or dripping from the unit
- There are water stains forming on the ceiling below an attic-mounted air handler
If you can access the air handler:
- Turn the thermostat to OFF
- Locate the air handler — typically in a closet, attic, basement, or utility room
- Look through the access panel or any visible gap around the unit
- Look for white or grey frost coating the coil fins or the refrigerant lines entering the coil
If you see ice on the refrigerant line outside the unit, the coil is almost certainly frozen. You do not need to open the unit to confirm it before starting the thaw process.
How to Safely Thaw a Frozen AC Evaporator Coil
Follow the steps in order. Changing the sequence is where most homeowners run into trouble.
Step 1: Turn the AC Off Immediately
Set the thermostat to OFF, or shut the system down at the breaker. Do not leave it running. A frozen coil forces the compressor to work under abnormal load. Prolonged operation in this state can cause compressor failure — an expensive repair.
Step 2: Switch the Fan to ON (Not AUTO)
At the thermostat, switch the fan setting to ON rather than AUTO. This runs the blower without triggering the cooling cycle. Room-temperature air moving across the frozen coil speeds up the thaw. It’s the safest method available without tools.
If your thermostat doesn’t have a separate fan setting, leave the system off and let it thaw passively.
Step 3: Allow Full Thaw Time
Depending on how much ice has built up, full thawing can take anywhere from 2 to 24 hours.
Do not use a heat gun, hair dryer, or any direct heat source on the coil. The aluminum fins on an evaporator coil are thin and easy to bend or damage. Damaged fins restrict airflow permanently and are costly to repair.
Step 4: Manage the Meltwater
A significant amount of water will drain as the ice melts. This flows through the condensate drain system — a PVC pipe that carries water away from the drain pan beneath the coil.
If the drain line is slow or partially clogged, the drain pan can overflow. Place towels or a shallow pan beneath the air handler as a precaution. A 5-gallon wet/dry shop vac is a useful tool here. You can use it to suction out a slow condensate drain line directly. This clears blockages caused by algae or debris buildup. For stubborn clogs deeper in the line, a drain snake can reach blockages that suction alone won’t clear.
Step 5: Inspect the Condensate Drain Line
Once the ice has fully melted, confirm the drain line is clear and flowing. A clogged condensate line is both a symptom of this problem and a potential cause of water damage on its own. If water isn’t draining freely, clear the line before restarting the system.
What to Do After the Ice Melts — and What Not to Skip
The most common mistake is restarting the AC without addressing why the coil froze. If you do that, it will freeze again — often within the same cooling cycle.
Before you restart:
- Replace the air filter, even if it doesn’t look heavily clogged. A partially restricted filter is enough to cause AC evaporator coil freezing on a hot day.
- Walk through the house and confirm every return air grille and supply register is fully open and unobstructed. Check that furniture or rugs haven’t been placed in front of return grilles.
- If the air handler is in an attic or closet, check that the space has reasonable airflow. Nothing should be stacked against the unit.
After restarting:
- Monitor the system for 30–60 minutes. If cooling resumes and the refrigerant lines stay frost-free, airflow restriction was likely the cause.
- If the coil begins to freeze again within one cooling cycle, stop the system. This is true even if you’ve already replaced the filter and confirmed open vents. That pattern points to a refrigerant problem. You need a technician before running it again.
What not to do:
- Do not restart the AC while ice is still visible on the coil or refrigerant lines
- Do not lower the thermostat setpoint to compensate for poor cooling — this makes freezing worse by demanding more from an already-struggling system
- Do not run the system if you suspect refrigerant loss — continued operation risks compressor damage
When Frozen Evaporator Coil Signs Mean You Need a Technician
Some situations are outside the range of DIY diagnosis. Call a licensed HVAC technician if:
- The coil refreezes within one cooling cycle after thawing and replacing the filter
- Refrigerant lines are consistently icing or sweating even with clean filters and open vents
- You hear a hissing or bubbling sound near the indoor unit — this may indicate an active refrigerant leak
- The coil has frozen multiple times in a single cooling season
- The system is 10 or more years old and this is the first time it has frozen — gradual refrigerant loss over time is common in aging systems
Refrigerant handling requires EPA Section 608 certification. Do not attempt to add refrigerant yourself. It is illegal without certification. Adding refrigerant to a leaking system without first finding and repairing the leak is also money wasted.
How to Prevent AC Evaporator Coil Ice Buildup from Recurring
Prevention is straightforward once you understand the causes behind frozen evaporator coil symptoms.
- Replace the air filter every 60–90 days during peak cooling season. If you have pets, multiple occupants, or a dusty environment, monthly replacement is more appropriate.
- Use the right MERV rating for your system. A very high MERV filter — MERV 13 or above — can restrict airflow on older systems as much as a dirty filter does. MERV 8–11 is the right range for most residential systems.
- Keep all vents fully open. Closing vents in unused rooms does not save energy in a standard forced-air system. It raises static pressure and reduces airflow across the coil.
- Do not run central AC when outdoor temperatures are below 60°F. Check the forecast before running the system on cool spring or fall nights.
- Schedule an annual HVAC inspection before summer begins. A technician will verify refrigerant charge and clean the evaporator coil surface. They’ll also check that the condensate drain is clear. These are the three factors most likely to cause evaporator coil ice buildup if left unaddressed.
A frozen evaporator coil stops your AC from cooling and can damage your system if ignored or handled out of order. The correct sequence is: turn off the system, run the fan only, let it fully thaw, manage the meltwater, then investigate the cause before restarting. In most cases, a clogged air filter is the culprit and a simple filter replacement resolves the issue. If the coil refreezes after the filter is replaced and vents are clear, the problem is refrigerant-related and needs a technician. Don’t skip the post-thaw inspection — that step is what separates a one-time fix from a recurring problem.